
Mechanical patient lifts, used in conjunction with transfer slings, are incredibly effective tools for safely moving individuals with limited mobility, dramatically reducing the risk of injury for both patients and caregivers. However, the safety and efficiency of these systems depend heavily on proper technique. This practical guide provides a step-by-step walkthrough and essential tips for using transfer slings with a patient lift, ensuring transfers are performed correctly, safely, and comfortably.
1. Why Proper Technique is Paramount
Using a transfer sling and patient lift incorrectly can negate their safety benefits and even introduce new risks. Improper application can lead to:
- Patient discomfort, fear, or injury during the transfer.
- Instability and potential falls.
- Damage to the sling or lift.
- Continued strain or awkward postures for the caregiver.
Mastering the correct steps is therefore crucial.
2. Preparation is Key: Before You Lift
Before you even touch the lift or sling, thorough preparation is essential:
- Assess the Patient: Evaluate the patient’s ability to assist, their comfort level, weight, medical condition, and any specific transfer needs or precautions. Determine the most appropriate type and size of sling based on this assessment and the transfer required (e.g., bed to chair, toileting).
- Inspect Equipment: Always perform a visual inspection of both the transfer sling and the patient lift before use. Check the sling for any signs of wear, fraying, tears, or damaged stitching or loops. Ensure the lift is functioning correctly, the battery is charged (if applicable), and the wheels are in good condition.
- Explain to the Patient: Clearly explain the transfer process to the patient, including how the sling and lift work and what they can expect. Address any fears or anxieties they may have. Encourage their participation if they are able.
- Clear the Area: Ensure the transfer path is clear of obstacles. Position the receiving surface (e.g., wheelchair, chair, bed) correctly and lock its wheels if applicable. Ensure adequate space to maneuver the lift.
- Gather Assistance: Determine if the transfer requires one or two caregivers based on facility policy, patient needs, and the type of transfer. Often, two caregivers are recommended, especially during initial training or for complex transfers.
3. Step-by-Step Guide to Using the Sling and Lift
Follow these steps for a safe and effective transfer:
- Positioning the Sling Under the Patient:
- If the patient is lying down, gently roll them onto their side away from you.
- Fold or roll the sling lengthwise and place the folded portion against the patient’s back, ensuring the bottom edge is positioned correctly (e.g., under the thighs for a universal sling).
- Gently roll the patient back onto their other side over the folded portion of the sling.
- Pull the remaining folded portion of the sling through and smooth out any wrinkles. The sling should be centered and flat under the patient.
- If the patient is seated, the sling may need to be slid down the patient’s back and under their thighs. Ensure they are seated as far back as possible in the chair before applying.
- Positioning the Patient Lift:
- Maneuver the base of the patient lift around or under the bed or chair as needed to position the lift arm directly over the patient’s center of gravity.
- Lower the lift arm towards the patient.
- Lock the wheels on the patient lift to prevent movement during the transfer.
- Connecting the Sling to the Lift:
- Attach the loops or straps of the transfer sling to the appropriate hooks or points on the lift’s spreader bar.
- Follow the manufacturer’s instructions for connecting the specific sling type. For slings with multiple loops, choose the loop configuration that will achieve the desired angle and support for the patient (e.g., using different colored loops to adjust recline).
- Double-check all connections to ensure they are secure before proceeding.
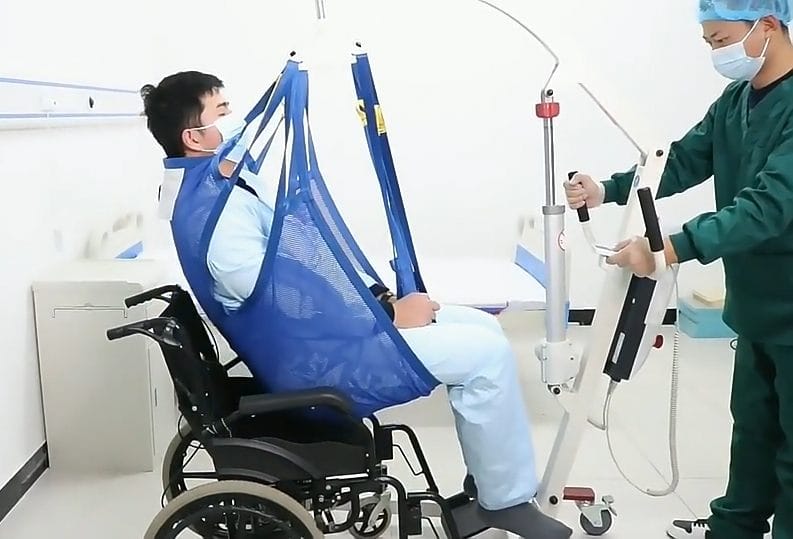
- Performing the Lift:
- Inform the patient that you are about to lift.
- Slowly and smoothly activate the lift to begin raising the patient.
- Raise the patient just enough to clear the surface they were on (a few inches). **Pause here to reassess.** Check the sling and connections one more time, and check on the patient’s comfort and security.
- If everything looks good, continue lifting the patient to the necessary height to clear any obstacles during the transfer.
- Maintain continuous verbal communication with the patient throughout the lift.
- Transferring the Patient:
- Once the patient is lifted, carefully maneuver the lift and patient towards the destination surface.
- Navigate smoothly and avoid bumping into furniture or doorways.
- Lowering the Patient:
- Position the patient directly over the center of the receiving surface.
- Slowly and smoothly lower the patient onto the surface. Guide the patient into the correct position (e.g., seated in a wheelchair).
- Ensure the patient is safely and stably seated or lying down before disconnecting the sling.
- Removing the Sling:
- Once the patient is safely positioned and supported, carefully disconnect the sling loops from the lift.
- Carefully remove the sling from underneath the patient. If the patient is lying down, this may involve gently rolling them again. If in a chair, it may involve carefully sliding the sling out from behind and beneath them.
4. Essential Safety Tips and Best Practices
- Always Follow Manufacturer Guidelines: Adhere strictly to the weight limits and usage instructions for both the lift and the sling.
- Regular Training: Ensure all caregivers are properly trained and competent in using the specific lifts and slings available in your facility.
- Communicate Constantly: Talk to the patient throughout the process, explaining each step and checking on their well-being.
- Avoid Pinch Points: Be mindful of potential pinch points when lowering the patient onto a surface.
- Report Damage: Immediately remove damaged slings from service and report any issues with the lift.
- Assess, Assess, Assess: Always assess the patient and the environment before *every* transfer.
5. Conclusion: Confidence Through Competence
Using transfer slings with patient lifts is a cornerstone of safe patient handling. While it may seem daunting at first, with proper training and consistent practice, caregivers can master these techniques, enabling safe, comfortable, and dignified transfers for patients while protecting their own physical health. This practical guide serves as a foundational resource; combine it with hands-on training and commitment to safety protocols to ensure every transfer is performed with confidence and competence.